Your progress:
What will you learn in this lesson?
After completing this lesson, you’ll be able to:
- Explain how to log time against projects, milestones, and actions.
- Explain when to mark an action as complete.
Let’s set the scene.
 |
Kelly has spent time completing work on the website project for Grommets Inc. and needs to log his hours for Layne to keep track of progress. |
Why is logging time important?
Logging time is the process of indicating that a number of hours have been spent completing work. It is an important activity within Mission Control. For a Project Manager, it allows them to:
- View the status of a Project, Milestone or Action.
- View metrics such as percentage complete for a Project, Milestone or Action.
- Invoice a client on a Time and Materials basis.
Time logging is also important for the team members working on a Project as this may be how they are paid. If time is not logged, there is no record of the team’s hard work, so they can’t get paid.
Where does time get logged?
If you think back to our Create Actions lesson, you might remember that work is assigned to a team member by either making them an Action Owner or a Contributor. This includes the number of billable or non billable hours in which to complete the Action. When time is logged in Mission Control, we are recording the time spent working on a particular Action.
A couple of important points to keep in mind when logging time:
- Time is logged as a number of hours including increments of times, down to 15-minute increments in decimals, i.e. 15 minutes would be logged as 0.25 hrs.
- Time is logged against the date on which the work took place.
- It is possible to log more or fewer hours than what has been scheduled.
- Time is logged as either billable or non billable.
Kelly has been assigned the Action to “Create Website Wireframes”. The Action record tells Kelly that he needs to start work on the website on Monday, has been assigned 16 hours to achieve it, and that it’s to be completed on Tuesday. Assuming Aprika Creative Agency use an 8-hour work day, that’s a solid two days of work that has been assigned to Kelly.
Layne has instructed Kelly to log time at the end of each day so that she can stay right on top of her Project and how it is progressing. Kelly would log 8 hours of time against the Monday as he clocks off for the day, and then repeat that process at the end of Tuesday.
What if Kelly is such a great web designer that he does not need all 16 hours to complete the website? Kelly would log the hours he used, whether or not they are the same as what was scheduled.
Work Assigned, Time Logged, Job Done. Right?
Not necessarily. It is one thing to log time, it is another to have completed the work. Irrespective of how much time has been spent on an Action, when the team member feels they have completed the work that has been assigned to them, they need to mark the Action record as complete.
Back to our scenario, and Kelly may have toiled hard for 2 days, logged his 8 hours for each day, but the website wireframes have proven to be a little more complicated than what was first estimated. The 16 hours have all been consumed, but there is still work to be done. Kelly needs to talk to Layne about having some more hours scheduled, so once the wireframes are completed, Kelly can mark his Action as complete.
How is time logged?
In Mission Control, time is logged via the Timesheet. This allows a team member to view all of their Actions that are due within a given week. They are able to log time and comments, edit time already logged, view holidays for the period, complete Actions as well as jump to the Actions and Milestones.
If no time has been logged for the week in view, no values will be visible in the hours fields. However, once time has been entered, revisiting the Timesheet will make those hours visible. Time can be logged using the start/stop time tracking functionality. With the right permission, it is possible to also enter time for other Roles.
Once time has been entered in the Timesheet, it can be saved or saved and submitted for approval. Your timesheet approver is the person named as the Timesheet Approver on your Role record.
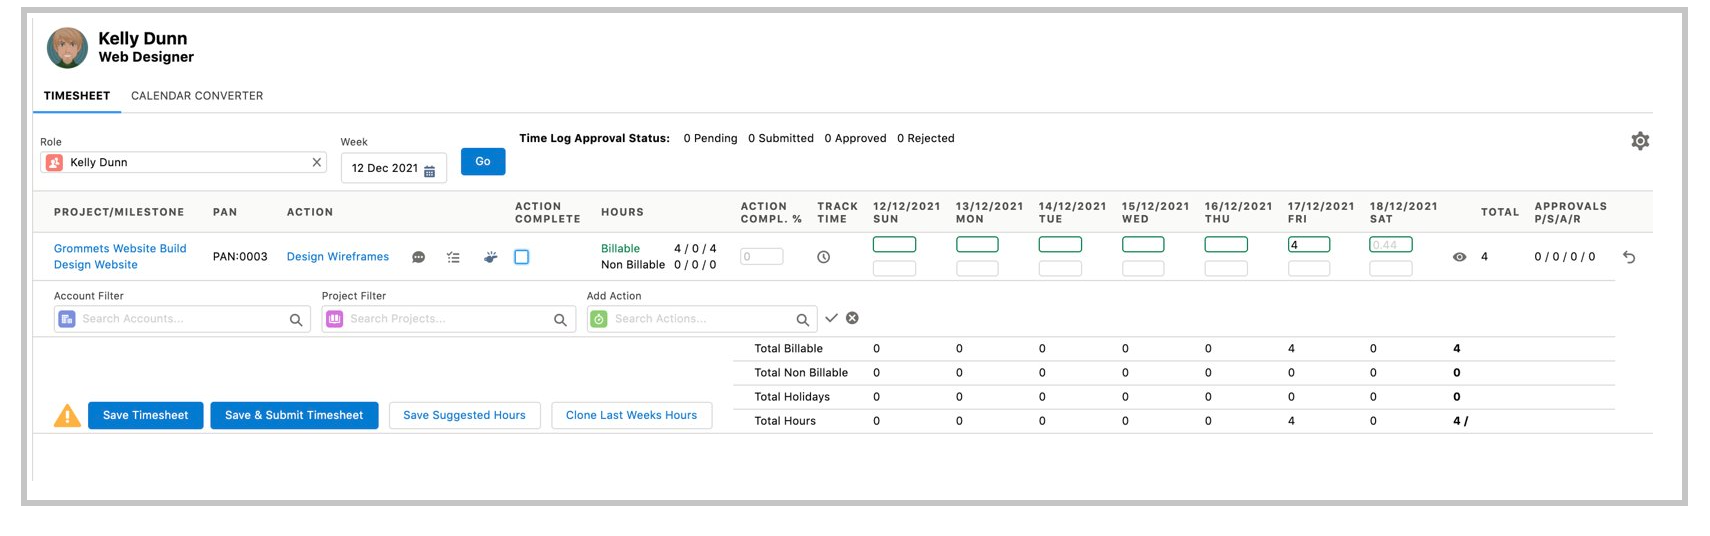
Features of the Timesheet are as follows:
Role – select the Role that represents the person you wish to log time for, defaults to the Role connected to the user currently logged in.
Week – select the week to log time for by using the date picker.
Project/Milestone and Action – the work due in the week selected.
![]() Time can be logged using the start/stop Time Tracking feature.
Time can be logged using the start/stop Time Tracking feature.
Billable / Non Billable Hours – the grid allows Billable (top row) and Non Billable (bottom row) hours to be entered for each Action for each day of the week selected. Double click on the relevant hours field to add supporting notes. The hours scheduled will show on the grid but will be greyed out – these are “Suggested Hours”.
Filter – use the Project Filter and Add Action to search for and manually add other Actions to the Timesheet.
![]() Add Chatter comments to the Action, Milestone or Project.
Add Chatter comments to the Action, Milestone or Project.
![]() View the checklist items associated with an Action.
View the checklist items associated with an Action.
 Mark the Action as completed.
![]() Timesheet settings – specify which information is to be displayed on the Timesheet.
Timesheet settings – specify which information is to be displayed on the Timesheet.
![]() Click to view the summary of a time log. Click the pencil from the summary to modify the details of an existing time log.
Click to view the summary of a time log. Click the pencil from the summary to modify the details of an existing time log.
Save Timesheet – use this button to save the hours as entered. If time approvals are being used, this button will set the approval status to ‘Pending’.
Save & Submit Timesheet -use this button to save the hours as entered. If time approvals are being used, this button will set the approval status to ‘Submitted’.
Save Suggested Hours – save the Timesheet with the hours as suggested in a light grey color.
Clone Last Week’s Hours – use this feature to duplicate the hours logged from the previous week.
Let’s log some time.
Kelly has completed the website wireframes and is ready to log time against the Action and mark it as complete. Here are the steps:
- Go to Timesheet tab – the filters default to the Role of the current user and the current week so no further filtering is required.
- Against the Create Website Wireframes Action, enter 8 in the Billable cell of the Action for both Monday and Tuesday to represent 8 hours of work for each day.
- Double-click in each cell where the number of hours has just been entered.
- Enter additional notes and click Save.
- As all work has been completed, check the Action Complete checkbox.
- Click Save and Submit.
Kelly has logged time and completed an Action.
Note: the Timesheet can also be accessed by clicking the ‘Timesheet’ button from the ‘Progress Pad’ Tab on the Mission Control Console. Time can also be logged in the ‘Log Time’ section on the TrackPad, via the Salesforce mobile application, or using the clock icon on the Whiteboard. We’ll cover these tools specifically in a later lesson.
All good so far – but what about the time spent in meetings?
In our examples, we’ve been logging time directly against the Actions we’ve been assigned. But as you would know, working on a Project is likely to involve lots of meetings that also take up your time. Luckily there is an easy way to create time logs directly from the meetings in your calendar.
Mission Control includes the Calendar Converter – you may have already noticed it as it is another tab on the Timesheet. It provides you with the ability to log time against an Action based on the calendar entries you may be seeing in your Outlook or Google calendar.
Note: the Calendar Converter assumes your organization is already syncing your Outlook or Google calendar with Salesforce. If you like the sound of this or aren’t sure if you already have it set up, speak to your friendly Salesforce Administrator.
Layne would like to see her time spent in a Project meeting logged in Mission Control. Here are the steps:
- Navigate to the Timesheet.
- Click the Calendar Converter tab.
- Click the time and date of your meeting.
- Select the Project, Milestone, and Action.
- Enter additional Notes.
- Click the ‘Log Time’ button.
- Notice that the event on the Calendar Converter is now displayed in the color relative to the Project, indicating that the Event has already been converted to a Time Log.

Before we move on…
Kelly has completed and logged time against the “Create Website Wireframes” Action and has submitted to his manager for approval. Kelly moves on to submit his expenses for the project and his manager, Layne, will now review and approve his time logs.
Ready to move on? Take the quiz below to test your knowledge.
